Apr 24, 2017

Google Earth

Just realised that I have not posted this sharing on Google Earth in inquiry-based learning which I shared with my colleagues June and Kelly @ the Humanities network on 7 April 2017 at Fajar Sec. The slides which we used for the sharing.


Making use of what I had learned from Paul Cornish in the Humanities Conference. You can also click on the link below to see how to create kmz files for geographical inquiry:
http://ezitnew.blogspot.sg/2012/06/using-google-earth-for-geographical.html

You can download Google Earth free here: http://www.google.com/earth/download/ge/agree.html


This is how the screen will look when you open up Google Earth app or plugin.


Perform searches from the search box at the top left side of the program. Let's visit Machu Picchu! 
This was very useful when I get the students to take a virtual trip there and explore the area as a place with rich heritage... some were debating that it is a place with scenic beauty as it is high up in the mountain! This virtual trip get them to relate better to the issues mentioned in the textbook such as erosion of the footpath etc. They learn better through authentic learning.

You can type a place name, zipcode or postcode, a town/city name, an airport or you can even try to type in a latitude-longitude location (in decimal format). Once you press the  Enter key, you'll be "flown" to that destination.  You can take a virtual holiday!
You can also drag the little yellow man icon to the map and you will get to see street view. I do this before I visit a place so that I can navigate the place easily when I am there!


Use the zoom out and zoom in options from the buttons on the right hand side of the screen.
Turn the wheel in the top right corner to spin the item to a better understood angle. 


Click on Exit Street view to go back to the map.

Look for the date the picture was taken from the bottom left hand corner of the screen.

My colleague, June, shared on how she use Google Earth to prepare the students for their GI in Chinatown. Indeed the tool is useful for them to take a virtual visit before the actual field investigation so that they will not be lost. The students can also be shown how to do the landuse survey, marking the main landuse on both sides of the streets.


Use of Google Earth for Physical Geography https://sites.google.com/a/moe.edu.sg/sec3geog/google-earth

I have attached some of the kmz files below which you can explore. There are also many kmz or kml files which you can use with Google Earth online.

2 of the kmz files attached below were created by me - one on map reading which is the coastal area south of UK. The map was from one of the N level papers. 


The other file is the Earth Tectonic plates. I have place marked the features or the plate boundaries you see the actual locations on Google Earth. 


Earthquake around the world kmz - WWeqANSS.kml  attached - Have you wondered where and when did earthquakes of magnitude 8 or 9 occurred? Open up the file and find out!


Open the earthquake focus file attached to see whether there is a relationship between the depth of focus and the plate boundaries.


Use the 4degrees file to investigate the areas where there are higher increase in temperatures.

Open up the Hurricane Katrina file to see the historical images on how the hurricane formed and moved over New Orleans. Scroll through the dates to see all the satellite images from different days of the year. 
Drag the location of the toggle slider switch in the top left corner to a different date and see what the area was like. e.g. you can see what New Orleans was like after Hurricane Katrina, or one of the many famous historical times that date back to 1990! 


Google Earth for Sec 2 https://sites.google.com/a/moe.edu.sg/sec-2-geog/using-google-earth presented by my colleague, Kelly.

You can also drag the yellow man button on the left to any of the blue line and you can see the street view.


This is one of the street view of Tokyo. Look at the high rise buildings and more developed infrastructure e.g. flyover, wider roads congested with cars etc.


The second file is on the Favela in Brazil (slum).  

Open the file with Google Earth. You will see the Favela area marked by a yellow line. 
To see the street view, drag the yellow man icon on the right to any point on the blue line.


You will able to virtually walk down the street by clicking on the road. Click on Exit Street View on top right hand corner to go back to the aerial view of the Favela zone in Brazil.

Look at the living conditions of the people in the favela by taking a virtual walk in the area using street view.

Look for the date the picture was taken from the bottom corner of the screen.
Scroll through the dates to see all the satellite images from different days of the year. 
Zoom to a place on the map where the satellite image has a date, click the "View" menu from the menu bar and click the "Historical Imagery" button to enable the feature. 
Drag the location of the toggle slider switch in the top left corner to a different date and see what the area was like. e.g. you can see how the Serangoon River mouth was like before the dam was built in 2010 in 2005, 2008 and 2010.


Click on the attached file below 'Forest' and then click on the pie charts in the various countries and find out which countries experience high rate of deforestation.

How much forest cover has Singapore lost?


Amazing effort by a teacher on enhancing the use of Google Earth through coding and design of app - something which I have yet to learn ( I just know how to use html with help of designer code in dreamweaver) https://www.gearthblog.com/blog/archives/2011/12/using_google_earth_in_the_classroom.html
The app online he created: http://www.geteach.com/ Love how you can analyse the maps side by side e.g. the population density versus the topography  etc

The Google Earth pages with files attached on my Google Sites:

Sec 1 

Sec 2 

Sec 3 

Sec 4 


Visible learners and engaging pedagogy

Love the sharing by my colleagues Elisabeth and Wen Ee today.

In fact there is a need for active and collaborative instruction coupled with various means to encourage student engagement which will invariably lead to better learning outcome.

The use of technology can help to engage the students and becoming visible learners. They shared with us the following links which contain very useful apps or website for educators.

http://www.educatorstechnology.com/2017/01/70-educational-ipad-apps-for-teachers.html

The Ultimate EdTech Chart for Teachers and Educators www.educatorstechnology.com

Another good resource shared by Wen Ee is freetech for teacher
A bit of "magic" using Aurasma which would definitely excite the students as they can use the app to see the picture comes alive in the form of a video. 

Engaging students using the app aurasma
I have learned about this 2 years ago and had wanted to try but have not done so. Decided to try a simple one using a photo of the tuned mass damper in 101 building to trigger an interesting video clip from a Taiwan news report.


You can try to use Aurasma to scan the following picture:

And it will come alive in the form of a video  (https://www.youtube.com/watch?v=VJDpDkDUYOE) on the screen!

To create an aura:
Sign up for an account @ https://www.aurasma.com/


Aurasma app can be downloaded 

Just activate the app and you can scan the trigger picture. Students will be amazed how the video will suddenly come alive in VR! Try it out today!


Extracted from my earlier post on Aurasma below:


An interesting app shared during the ICT symposium 2015 - Aurasma
It can be downloaded from App Store for IOS and Play store for Androids (however my Samsung Note 4 is not compatible and cannot download it. It works on my Samsung Galaxy Pro)
The app offers a lot of potential in creating virtual learning. 


Aurasma allows users to create or view augmented reality experiences. The user open up the app and capture the photo with the camera. The image will transform into a video, animation, another image or bring you to a website with more information. 
To create their own Auras, students or teachers choose an overlay and a trigger. An overlay is a video, image, an animation or a website link that will appear when someone finds the trigger object or photo. 
Tutorial on creating a sequenced aura using the aurasma studio https://studio.aurasma.com/login
https://youtu.be/CaczBAfdRns - so cool being able to create a scavenger hunt with photos. User just scan the photo and could see a video or even a url link providing more information.

Use of Aurasma in teaching:

https://youtu.be/uHIxYpBW7sc?list=PLYk2ySKukLs6Fih_6xze0EYRyGJguDYCF

Use of Aurasma in learning nature:

https://youtu.be/WRS_nZOOMyY?list=PLYk2ySKukLs6Fih_6xze0EYRyGJguDYCF

Nov 18, 2016

Using mobile app for Art and Science

I am always amazed by how mobile app can help in engaging the students in learning. This is especially so when most students own a smart phone nowadays and they could download many apps free. I have shared earlier on how mobile apps can be used for Geography  - http://ezitnew.blogspot.sg/2012/06/applications-from-google-play-android.html 

Though the followings are mobile apps for Art and Science, I must say I was quite fascinated by them. This is especially so for Prisma which I could turn my photos into the different Art piece immediately. A great way to learn the different Art style!

You can either take a photo or choose from your gallery a photo and then click on the various art filters to see them being converted in seconds! I have converted two photos which I took and I am really awed by the effects.


Another similar one is Deep Art Effects - more filters but can be quite laggy.

Using the free wRiteFormula app, students played a game to understand the nomenclature of ionic compounds. Students advanced in the game by gaining experience points and they’d receive immediate feedback on their performance. As a results, Chemistry concepts came alive in an exciting form, helping students to enjoy the process of learning that much more.
https://play.google.com/store/apps/details?id=com.ixorastudios.writeformula&hl=en


  • Race against time to form chemical compounds (IUPAC Nomenclature) in this new and exciting educational game!
  • Form chemical compounds using various ions that appear in the game!
  • Answer multiple choice questions with the correct chemical formula and name of the compound to achieve higher scores!
  • Consecutively form compounds and answer questions correctly to earn huge score bonuses!
  • Learn from the mistakes you make during the game by looking through the game summary and feedback after a game!
• See elements in their natural state and real-life applications.
• Incorporated Podcasts and videos.
• Use the interactive slider to see how elements change state as temperature increases, or explore the discovery of the elements through history. 
• Use the simple table for quick access to data – like sorting elements in order of increasing density.

Khan academy provides more than 4,000, free downloadable videos, so you can brush up on everything from K-12 math and earth science to art history and computer science. You can also track your progress and unlock basic achievements. https://play.google.com/store/apps/details?id=org.khanacademy.android

The PlantNet Plant identification app is also very good for Bology or even Geog!
https://play.google.com/store/apps/details?id=org.plantnet&hl=en

Just take a picture with your camera or select from your picture from your gallery. 
It can be a flower like the one above or a fruit like the one below.

Then click on which part of the plant the picture shows. 


The results will be shown as above and the scientific name of the plant shown.


I have shared in an earlier post on the use of mobile app for Geography:

Apr 1, 2016

Google Site

My sharing with the teachers in the humanities teachers on the use of Google Site for self-directed and collaborative learning. 

The use of google site allow students to be self-directed in their learning as they can select, manage, and assess their own learning activities any time beyond their curriculum time. To further engage the students in their learning, interactive resources such as Zaption interactive videos and Quizlet can be embedded into the Google site. 

Physical Geography Lessons http://tinyurl.com/sec3geog  
Human Geography Lessons tinyurl.com/sec4geog

Update 2017 - I have created two more sites for lower sec:
Sec 1 - https://tinyurl.com/y1geog 
Sec 2 - https://tinyurl.com/y2geography

Inquiry-based learning is infused through geographical investigation using the Google Site. The use of Google site helps the groups direct their geographical inquiry collaboratively as well as allowing them to review the steps needed in the geographical investigation to encourage self-directed learning. An example will be an inquiry on water quality by the Secondary 1 students from Edgefield Secondary School. Permission I a given by level which means some pages can be viewed by public but students group work can only be viewed with sign in. After they have signed in, they can only on the age assigned on their findings and reflection as well as attach a copy of their final product.
I have also used Google sites to guide the students for GI on Coastal Studies and Tourism

Sec 1 GI on Water Resources 2015 http://tinyurl.com/watergi2015
Sec 3 GI on Coastal studies @East Coast Park   tinyurl.com/gicoast
Sec 4 GI on Tourism @ Chinatown tinyurl.com/gitourism

It is also great for sharing resources among the department teachers as it is a secured platform which access permission can be controlled - only share with a certain group of people - intranet. It is a great platform as a repository of resources and the whole site can be duplicated for another year or level. Instead of webpage, you can change the page format to file cabinet. Those who had been given permission to access the site can click on subscribe to changes and a email will be sent once a file is added.


Mar 9, 2016

Zaption - interactive video lesson

Sad to update that Zaption platform was officially closed on the 30 September 2016

I was introduced to Zaption by a fellow colleague and decided to try it out as I could embed it on my Google site for self-directed learning, especially those who had missed my lessons.

You can sign up for an account free @ https://www.zaption.com/ 


It is easy to use and great for self-directed learning and definitely a great tool for flipped classroom. I definitely agree that Zaption makes online video interactive and this will definitely engage students better and drives deeper learning. The student also can pace his/her learning using the interactive video.

I have screenshot the steps I took to create a lesson using a video. After you have logged into Zaption, click on"lessons"on the top menu and click on "New Lesson"on the scrolled down menu.


Copy and paste the url of the online video or upload one from your folder.


Confirm the video clip and click on "add this video for lesson".


I like the ability to trim the video clip by dragging the markers to mark the start and end of the clip as some video clips might be too long. A more effective video clip should be less than 5 mins.


You can then choose to include interactive elements from the top menu - multiple choice, check box, open response, drawings, image or text slides into your video lesson.


Other than MCQ, you can also add in check box, drawing, image or text slide just by clicking on the icons shown below and drag them to the main panel or side bar:


Click on publish and a pop-up window will appear for you to enter a title for your lesson.


The best part of using this tool is that you can analyse the responses of your students to keep track of their learning!


I have tried created 2 lessons - one on internal structure of the earth (http://zapt.io/tvh8bz2u) and the other on Kyoto Protocol (http://zapt.io/trap3wss) and embedded the clips onto my Geography Google site - https://sites.google.com/a/moe.edu.sg/sec3geog/weather-and-climate/wc-k2-lesson-8


Nov 9, 2015

QR codes

The QR code is useful to provide instant link to a url or text. The use of QR codes on name cards and brochures are getting popular too as one can be directed to a website without having to type out the url but with a QR reader which is available in most smart phone and can be downloaded free.  

I have created the QR code to my Geography blog and Google sites:
If you just want to generate a QR code link to a url or text (or even full contact for phone!), you can make use of https://www.the-qrcode-generator.com/

You can even generate a QR code for Chinese text! Scan the QR code below and find out what our vision is in Chinese!


You can make use of the QR code in many ways for teaching and learning too as mentioned on the website "25 Fun Ways to use QR codes":

1. Create scavenger hunts and/or webquests for your students that get them moving around the room. Scanning a QR code makes is easier for the students so they don’t have to type the long urls. 

2. QR Stations for self-directed learning - The students scan the QR code to reveal the task and the students must work together to get the task complete. This builds on the 21st century skills of communication, collaboration and critical thinking.

3. Classroom Hot Spots! - Provide information ‘hot spots’ throughout the classroom to access online videos, websites, text that is related to curriculum and instructional material.

4. QR codes are useful in providing links to surveys or votes. You can also use it as an exit pass - as the students exit from the class, they can scan the QR code and finish a short survey or vote.

5. Add QR codes to homework sheets that link out to sources of help. For example, if the student forgets how to solve a Math problem or gets stuck, they can scan the QR code for help. The QR codes can be linked to a ‘how to video’ such as aKhan Academy  video or a ShowMevideo you created yourself. A good way to introduce the flipped classroom concept.

I have used QR code treasure hunt generator from classtool to generate a fun challenge for students - something similar to the scavenger hunt above -

A simple one which I have created:

A. Prior to the lesson
1. Arrange students into groups. Each group needs at least ONE person who has a mobile device (note: an internet connection will not be needed) and have the QR reader downloaded into their mobile devices.
2. Ask students to
3. Print QR codes for each of the quiz question.
4. Cut them out and place them around your class / school.

B. The lesson:
1. Have the first ('introduction') QR code on display on your whiteboard.

2. Each team scans it into their device and then get the clue to start the hunt around the school for the remaining QR codes.
3.The winner is the first team to return with the most correct answers in the time available.

C. Tips / Other ideas
1. Award teams ONE point for each question they successfully decode, and a further TWO points for each correct answer that they provide.
2. Students in each team that do not have access to a mobile device can be responsible for research answers / hunting down the other QR codes for their teams.

You can create a lesson such as History mystery or Science mystery using the QR treasure hunt generator. 

Sep 5, 2015

Using Google doc and Google drive

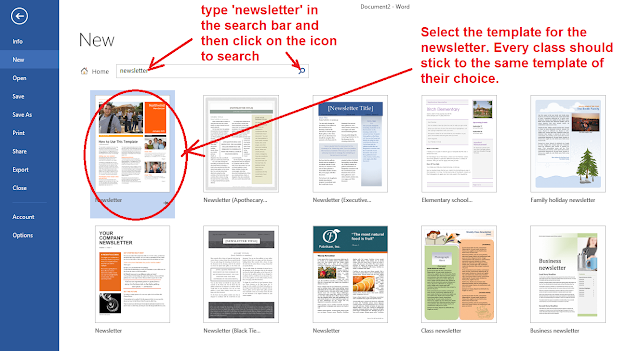
An easy way to create class newsletter will be to use the templates for newsletter in Microsoft Words. Further collaboration by the students on the newsletter can be carried out via Google Docs as shown below.

Create a new word document and choose a newsletter template.


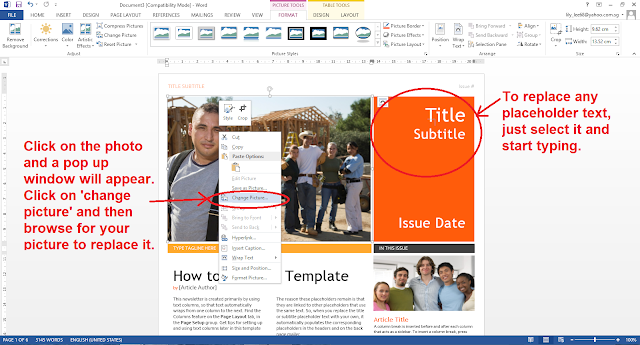
Students can then replace the text and photos on the template as shown below. They can add more pages or delete them as necessary. 


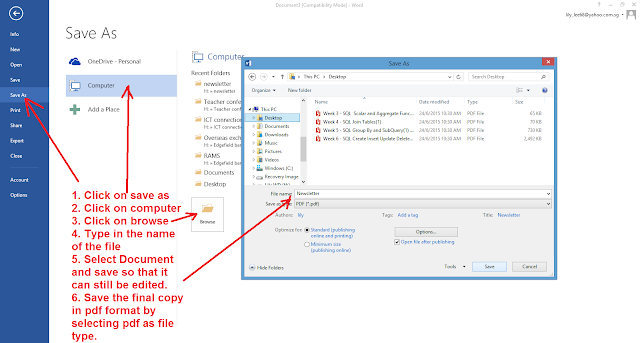
They can save the document in word document for editing as well as pdf for the final version.


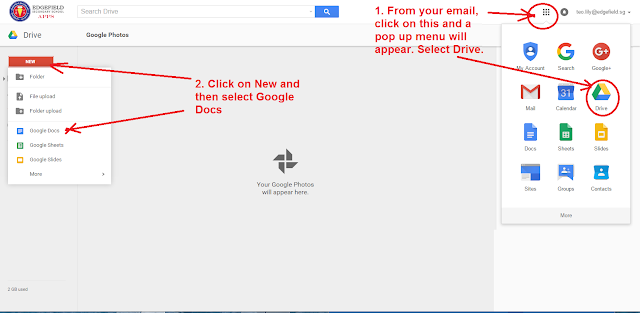
By using Google Docs, the students can collaborate and contribute the part assigned to them as well as read the part completed by their classmate. They can do this by accessing Google drive through their email account. They can then create the Google docs in the Google drive.


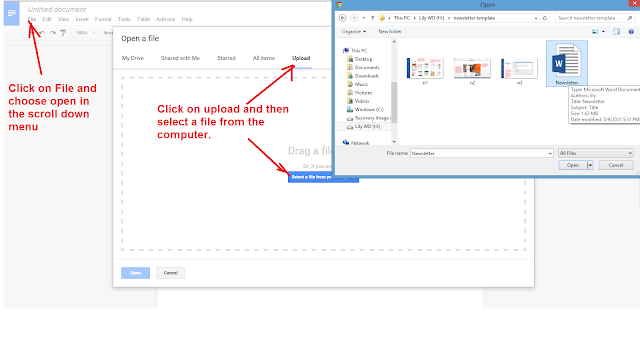
The leader of the team can open up the file which they have created using the Microsoft Word templates.

The leader can then assign rights to his/her team members to edit the document.


Sharing can also be done in the Google drive.