Dec 12, 2019

Talltweets Convert Slides to GIF

I have been using Macromedia Firework to create GIF. Just learned that you can do that using https://talltweets.com/ to convert Google Slides into animated GIF!

Click on the following link for the interactive slide
https://docs.google.com/presentation/d/e/2PACX-1vT7HwBndGTt174FgVYhGyPXJJJL-aynOBnAdASuzmuAdp_tZZz4yYeIFxkX3bLJdlCc-gyIrROyqulU/pub?start=false&loop=false&delayms=60000&slide=id.g6c59ada23f_0_0

created my GIF for my Google classroom and is so easy. Just create the Google slides and then @ talltweets.com choose the google slides and it will convert it to a slides as shown below.

Go to talltweets.com and click on select presentation to browse for your Google slides.

Then just specify the width, e.g. 800 for the header in Google classroom. Then click on create GIF and you download it by clicking save.


Create a custom banner GIF

Watch the video below showing how you can use Google Slides to create a GIF.

Use Giphy Chrome extension to add animated GIF and stickers to slides.
https://chrome.google.com/webstore/detail/giphy-for-chrome/jlleokkdhkflpmghiioglgmnminbekdi?hl=en

Dec 10, 2019

New Features on SLS

So grateful for the new features on SLS released in Dec 2019.  https://mo.learning.moe.edu.sg/UserGuide/Vle/index.html (SLS login needed to access the user guide) 

I have highlighted three features which I really love.
Now you can add teachers as students. Great for PLC as well as collaboration with other teachers. You can also try out the lesson as a student by changing your role in the profile.


You can also attempt lessons as student.

You can also make announcements on SLS.

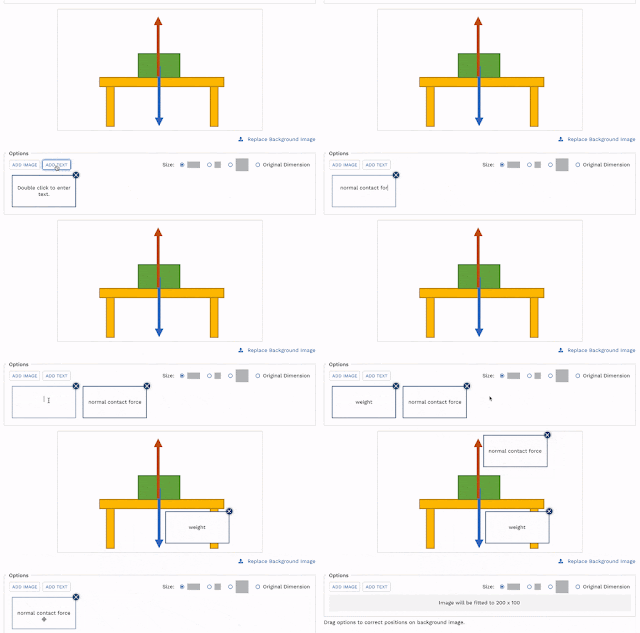
My favourite feature - Drag and drop question!

  1. Upload a background image. The image must not exceed recommended dimensions of 640(W) x 960(H). You can use paint to size the image - please see below. Or you can do so by using Powerpoint - resize the slide to custom size and save the slide in image file (jpeg).

  2. Add Drag and Drop options in the form of images or textboxes.
    • These options can be resized to fit the blanks in the background image.
    • Drag the options to their correct positions on the background image.


 Students will answer a drag-and-drop question by dragging the moveable images or textboxes into the areas marked out as options. This is what the student will see:

Tried out 2 for Geography. One in which the students have to identify the location of the correct country and then drag and drop it to the image of Africa. The second one is to identify the tectonic features and landforms on a given diagram.  It is easier to upload labels created on Paint as the options for the drag and drop to the image. As for the background image if the size is too big you can resize it e.g. to 80% of the original and then upload.  


Adding Quizzes to your lesson
Since Dec 19, only lessons can be shared. You should be able to insert a quiz into a lesson and share the lesson. The gif below shows how to insert a quiz that was created previously.

Thanks to Send Kwang for sharing in SLS

Whitelisted websites for embedding into SLS (only via login to SLS)

Nov 14, 2019

Cospaces and blocky in creating VR experiences for students

Applauding the efforts of the team from Hua Yi Sec in using VR in teaching Geography concepts.

You can log into cospaces and look at the 3 experiences which they have created to get the students to explore the unique features of a Place in Geography.
 You can search for Clementi, Tiong Bahru and Ang Mo Kio in cospaces.


Definitely excited to learn about Cospaces and how you can add the animated characters to theVR experience using Blocky. Will definitely explore!


They have also created the VR experience as a virtual reccee for their Upper Sec fieldwork at Orchard Road.

They have shared other VR resources available online such as the one on Malaria in Tanzania.

and the ST simulation of rising sea level in Singapore.

360 view of an sea arch:


Nov 7, 2019

Screen recording function on Powerpoint

I have always love Powerpoint. Just saw from Byte IT from MOE ITD that you can screen record with screen recording function in Powerpoint and decided to try out.

1.Select Insert from the top menu.
2.Click on the Screen Recording icon from the top right hand corner.
3.Click on window logo button +shift+Q to stop recording.

Or you can click on the pin icon at the bottom right of the pop up control so that you can just click on the stop button when down. During recording, there is also a pause bottom. This is useful as I gotten my students to take turn to do recordings for a project.

You can select the area on the screen for the screen recording (area marked bythe red dotted lines). You can also select whether to include the audio or pointer.

Reminder to click on the pin at the bottom right corner so that the control is available throughout.

After you have finished recording, it will appear as an inserted media on one of the slides. You can right click on it and save it as a media like the one below.

You can see how I made my inserted graphic background transparent.

When I selected the area to record to only the slide area - you can get the students to create a story easily. I did not include audio for this but you can get the students to do so.


Shared by Adeline in SGLDC 

In powerpoint, there is a record slide show tool that records narration, annotation etc. 
You can record your voice over slides, allowing you to 'teach' as you go through the slides. Once done, 
(1) Go to file, export, create a video. 
 (2) Upload to youtube, private setting 
 (3) Embed the video into SLS. 
 Can be use to scaffold learning and going through questions, especially those that needs some annotation / drawings. 

Aso shared by Harley.
Directly click on “Export”, select “Create Video” and record narrations also can. Once done, click “Create Video” again and it will be converted into a MP4 video. 


Also look at how I made use of Powerpoint to create Quiz and Games:http://ezitnew.blogspot.com/2017/05/use-of-powerpoints-for-quiz-and-games.html

Though much of my use of Powerpoint has been replaced by Google Slides.
Following is the use of Google slides by Amanda:
https://docs.google.com/presentation/d/1sxFjWXBWJbC_PPIlNFuG56It0LJOFI7va8I_x_CJM4Q/present?slide=id.p

Nov 1, 2019

Draw

Great sharing by Tom Mullaney on 4 drawing apps, including autodraw which I mentioned below.
Google Jam, Google Keep and Chrome canvas

Sep 1, 2019

My Notes in SLS

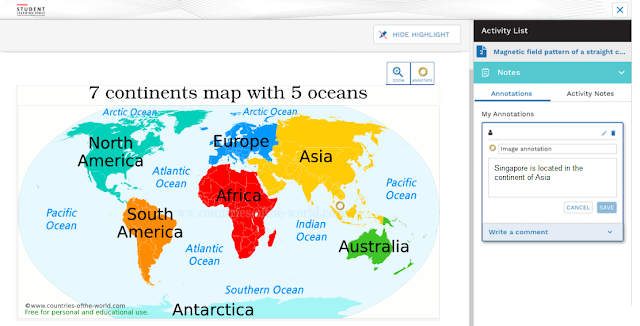
Check out the new My Notes feature in SLS

Guide by ETD:
https://mo.learning.moe.edu.sg/UserGuide/Vle/student/notes/annotation.html

On the students' device.

The students can highlight on the text using different colours as shown below.

After highlighting the text, the students can add annotations or activity notes and save. The student can also edit or delete the notes as shown below.


Student needs to click on the annotate buttonon the top right of the image.

Teacher can view the students' notes.
Click on monitor followed by view students' notes.


Cool to be able to view all the notes taken by the students.

Aug 31, 2019

Kami app

Just learned about Kami app.
https://www.kamiapp.com/
It will automatically convert the PDF to text with selection of OCR. It can open up photo too so you can also get the students to take a picture of their work just like showbie.

It's so good for note taking and the teacher can also give comments in written form, audio, video or screen recording.

Just sign up for free. You can open the file from Google drive or from your laptop or smartphone.


You can choose to highlight, draw, cancel, underline, insert text, image or shapes or even draw on it. If you make a mistake just use the eraser and erase it.


I like the insert text function in that after you typed, you can still open it up and edit as well as to shift it to another location.


I love the text to speech function. Look at the video before how it read out the instructions for the paper. The text is highlighted as it is being read aloud.


The note will be automatically stored in the kami cloud but you can also make a copy in your Google drive or download.
Just realised it can make notes on my excel file as well.

Updated 5 Apr 2021
Shared by Gilbert in SGLDC
He shared on the screencapture comment function of Kami which was very useful for him recording video feedback on essays.

Aug 22, 2019

Open classroom - using SLS to teach geographical concepts

Greendale Secondary School open classroom on the topic deforestation. An opportunity for us to see how the teacher uses SLS to blend in assessment for learning and geographical concepts in the teaching of the topic on "impacts of deforestation". Tapping on the embedding function and the use of simple analytics from students' responses, the lesson showcases the use of updated features such as the thinking routine in SLS.

We were given a chance to view a blended lesson 1 of 2 lessons in the sub topic of impacts of deforestation with a class of 40 Sec 1 students.    

The teacher made use of the SLS platform to support the inquiry based learning.  The teacher led the class in looking at the geographical issue with a poll in SLS on what the students think is the most significant impact of deforestation. He proceeded to task each pair to look into an assigned impact with a variety of geographical resources in the form of text extracts, diagrams and videos embedded in SLS i.e. E1 pair to look at impact on biodiversity, E2 pair to look at impact on water catchment and E3 on enhanced greenhouse impact. The students recorded what they had learned from the resources on the impact assigned to them in the SLS thinking routine. The teacher quickly bookmarked a few responses and highlighted some concepts which the students had shown to be lacking in their understanding from the thinking routine responses. e.g. the teachers clarified what is surface run-off and how it can contribute to river flooding. He also made a point to highlight the inter-connectivity of the various impacts. 

Then the students proceed to change their partners at their table to share with the other students on why the impact is more significant than the other (expert group strategy). The lesson ended with a revisit to the question on what they now think is the most significant impact of deforestation and the students responded individually on SLS thinking routine.

The design map of the lesson shared:


Before we proceeded to the classroom to observe the students for the lesson, we were reminded that we would be taking turn to be at the tables to make the observation of students' responses. (20 seated at the tables with the students and 20 seated at the back to observe and then swopped).

We were given the following recording sheets to record our observations:


The sharing ended with a discussion on the planning and enactment considerations in the conduct of the lesson. What we observed in the lesson which thinking was made visible and how students collaborated to make sense of the geographical concepts as well as how formative assessment was weaved into the lessons.


 Our takeaway:


Thoughts on the lesson shared with us-

1. Be willing to give up some control - a true student-centered lesson needs to be led by student actions.

2. Using SLS means students can access learning materials in their own time, at their own pace - they are not limited by their prior knowledge or access to information.

3. Have high(er) expectations of students - they will usually surprise you with what they are capable of.

4. Consider the highest value use of classroom time (e.g. discussion, sense-making) & do that.

5. An SLS lesson can be covered over several F2F sessions - you can release segments over.

6. The definition of what a lesson is can extend beyond classroom time (e.g. pre, post lesson learning) - we may want to explore how we think about lessons and reframe our definition of what constitutes a lesson.

7. The 4 Vs of data - value, volume, velocity, veracity - make managing student inputs increasingly challenging. We will need to evolve new strategies for managing them.

8. One strategy to manage the increased volume & velocity of data might be to consider peer/self-assessment strategies, both online (e.g. have students comment on each others' responses) & F2F (e.g. getting students to clarify with each other).

9. We should use SLS to make our teaching better, not only easier - it should make low-value activities easier (e.g. searching for resources, collating student inputs, distributing feedback) & free time up for us to do more high-value activities (e.g. designing learning experiences, exploring different ways to reach out to different students, crafting feedback). 

10. The learning artefacts (e.g. student responses) of one lesson can be used as teaching materials in subsequent lessons.


SLS is an enabler for better teaching & learning:

1. Rich repository of quality, curriculum aligned resources

2. Promoting visible interaction (student-content, student-student, student-teacher) for learning

3. Opportunity to change the way we deliver learning experiences (e.g. more inquiry, authentic conversations)


Aug 4, 2019

Apple training 2 Aug 2019

I like the ice-breaking activity which our Apple Learning Specialist, carried out using a name card template by keynote. A good way to get to know the other teachers in the group. After editing the name card template - we can airdrop the image to each other and keep the contact.
Good workshop by Apple professional development leader. His activities made me pause and reflect. He made use of the four corner strategy and gotten us to take our stand on the statements made.  Indeed it helped us to look at how different we interpreted the statements. Then he also got us to look at a question on whether a 40 cm pizza which cost 40 zed has more value for money as compared to a 30 cm pizza which cost 30 zed. Rather than using a mathematical approach, many have interpreted value in a different way. The activities allowed me to see how different people express themselves in different ways and how we can approach the same statement/problem in different ways.The activities reminded us that we can set mindful activities to level up creativity and that we can utilise technology effectively for learning. Technology enables the teacher to connect with big group who learn differently.  Technology also enables teachers who are also good in their teaching to put in the structure for cognitive demand – to allow the students to be engaged in a way in which they are able to interact with content.


Break out into our subject group. We were tasked to look at landscape and publishing in our group. Showed the other two teachers how we could uses sketches school which I learned in the last training to do a sketch and annotation. Started with importing the photo, reduce transparency, remove the photo and then annotate. 


The padlet which different groups shared their ideas.

Made with Padlet

Two teachers shared their lessons using Pages and one of them is my colleague.  Very impressed on how his project-based learning allowed the students to reflect and deepen their thoughts as well as expand their creativity. 


Sharing by Geography teacher :