Richard shared on the use of QRtoon and the many uses of QR codes
https://www.freetech4teachers.com/2022/01/five-uses-for-qr-codes-in-school.html?spref=fb&m=1
Tried out the QRtoon and this is mine. Easy to create on the web version.
Richard shared on the use of QRtoon and the many uses of QR codes
https://www.freetech4teachers.com/2022/01/five-uses-for-qr-codes-in-school.html?spref=fb&m=1
Tried out the QRtoon and this is mine. Easy to create on the web version.
Shared by Hwee Hwee in SGLDC which sounds so fun! I think this can also be modified for bonding activities or geography with background featuring places which they would like to visit. They can then use where, why, who, what to analyse what make a place a tourist destination
Sec One History
Learning about the past
1. Go to National archive
https://www.nas.gov.sg/archivesonline/search
Find a photo: search by school or theme. Eg: national school games
2. Download the photo
3. Take a photo of ownself. Change it to black and white if the photo from National Archive is black and white.
4. Use remove background app e.g.
Upload photo of oneself and click edit.
Upload the national archive photo as background.
Download the photo.
5. Post in Padlet the photo you have created and do a
"See, Think, Wonder"
Example from her post (only viewable by members of SGLDC)
https://www.facebook.com/groups/sglearningdesigners/permalink/1259488011205707/
Photo credit for background from NASBrought the student back in time to watch the Chingay 2005, way before he was born!
Definitely a good way to get the students curious about the past. The notion of place and time.
Side note that NAS is very useful and easy to use in searching for old photos.
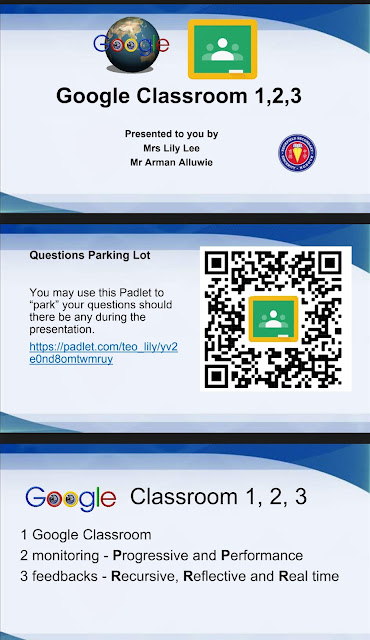
I shared on the use of Google Classroom with Arman for the SGLDC Virtual meet. The link to the slides and video recording of our sharing in SGLDC virtual meet on Google classroom.
The Covid-19 has brought both challenges as well as opportunities. I was checking the whisper tour guide system and it is both expensive and space consuming. Now the technology has evolved and one of the tours I saw on klook is using πΏππ¨ππ€ππ―π app. What an ingenious way of conducting a tour or learning journey. It integrates a live audio streaming system using smartphone which most of us possess.
How it works:
1. Both Speaker and listeners must install and open up the app on their smartphone.
2. Speaker will create a name for the channel e.g. lily-geog and share that with the listeners.
3. Listeners plug in a regular set of earphones to their smartphone and click on listen and input the channel name e.g lily-geog
4. The speaker only need a standard microphone like those that come with most earphones. He/she can mute the mic if not speaking.
πΏππ¨ππ€ππ―π is a digital tool that only requires an internet connection. That means flexibility, reliability no space limitation.
Would really love to hear from you if there are similar ones which are better. This will definitely help when we are conducting learning journey in the public places and would not want to raise our voices.
Just wondering if there is one with 2 way communication. In case listener would like to ask a question.
Great if bringing the students to a public area and do not want to raise your voice and ensure they can hear you.
First shared on FB SGLDC https://m.facebook.com/groups/sglearningdesigners/permalink/1003974766757034/
I used to be able to edit my Classic Google Sites on my mobile. However, I had to convert all my Classic Google Sites to the new format. I just found out how to do it.
1. Click on the 3 dots on the Chrome Browser to access the menu.
Did you know you can EASILY cite sources without ever leaving Google Docs? Yep! It’s so easy!
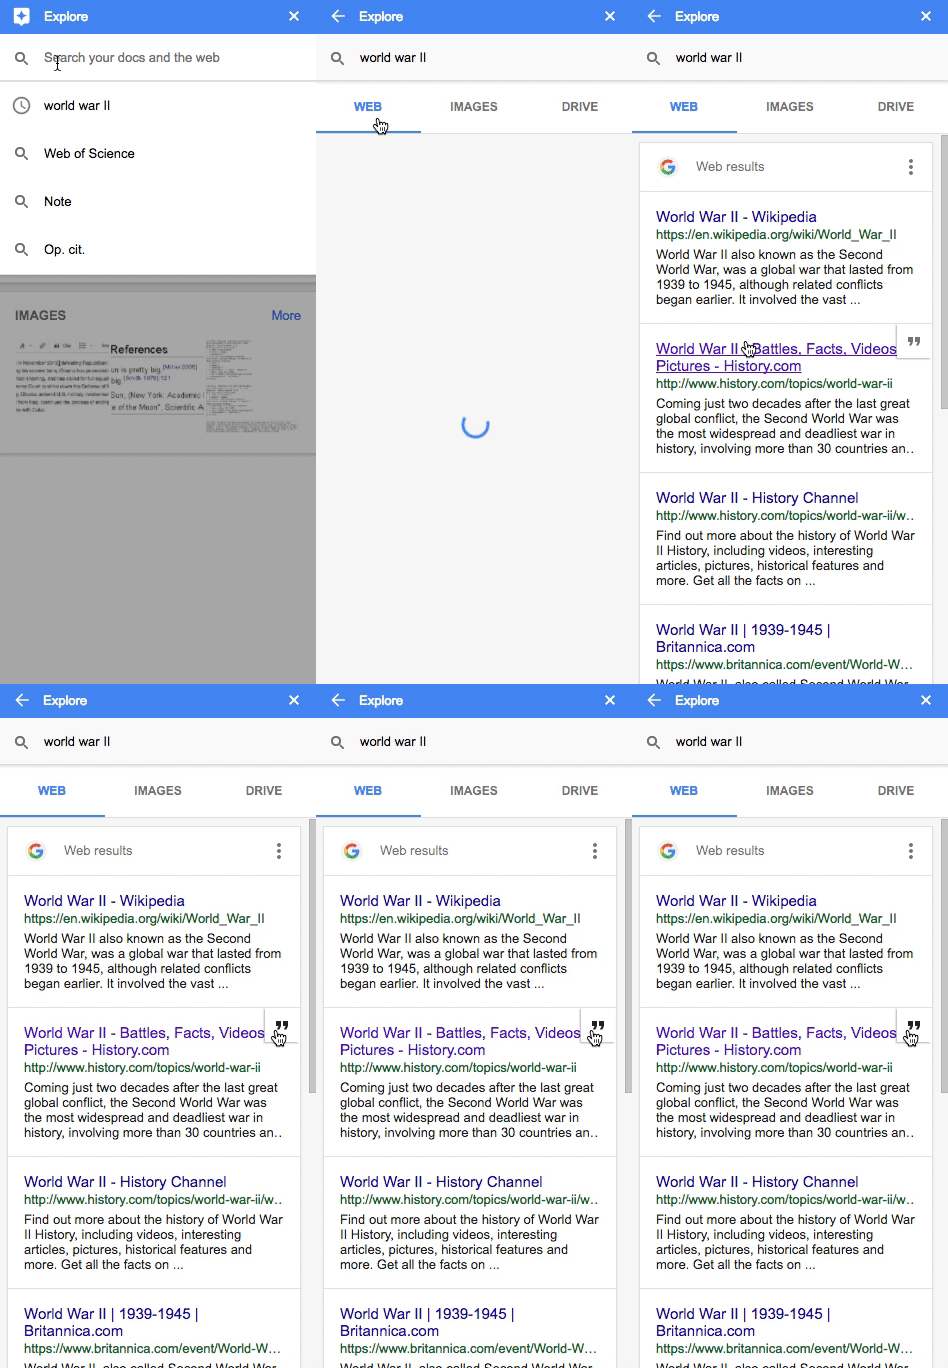
You can easily add footnote citations by using the Explore tool in Google Docs.
1. Go to Tools>Explore (or click on the explore icon 0n the bottom-right)
2. Type in your search query to find the source
3. Hover over the result, then click on the quotations " in the top right of the result
4. A footnote citation will be added to the bottom of your doc
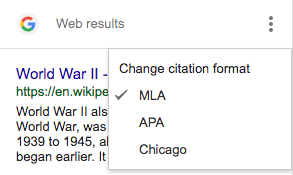
You can cite the source in MLA, APA or Chicago!!!!!
Go to the three dots (snowman) to change from MLA, APA, or Chicago.
Source: https://shakeuplearning.com/blog/10-google-docs-tips-every-teacher-should-know/
Remote for Slides turns your phone into a presentation remote! You can even see the speaker notes on your device. No need to use remote with USB/Bluetooth. You won't lose the little adapter AND you can easily see the buttons to go forward and back to a previous slide.
Features:
1. Install Remote for Slides Chrome Extension from the Chrome Web Store. https://chrome.google.com/webstore/detail/remote-for-slides/pojijacppbhikhkmegdoechbfiiibppi?hl=en
Add the app on your mobile
2. Open your Google Slides in Editor Mode, then click on the “Present with Remote” button.
3. Next, click on the “Start Remote” button to show the 6-digit code.
4. Enter the 6-digit code in the Remote for Slides Progressive Web App (s.limhenry.xyz) or in the Remote for Slides Lite Android App (bit.ly/slides-lite) , and you are ready to go!
On Google Slides
With a shared premium account, you can create groups and collections for greater collaboration in building up the Kahoot resources.
Create groups in the school account.
Invite members to your group and the members can share the quizzes they have created. Remember to duplicate a copy so that it can be added to the collection in the designated folder.Also to note - under the premium account you can assign the quiz to a maximum of 500 participants.
This is great for HBL as you can assign the quiz to the whole level.
http://ezitnew.blogspot.com/2020/04/kahoot-on-hbl.html
Under the premium account, you can also use the type answer option for question type.
Totally grateful to this tool from Windows 10.
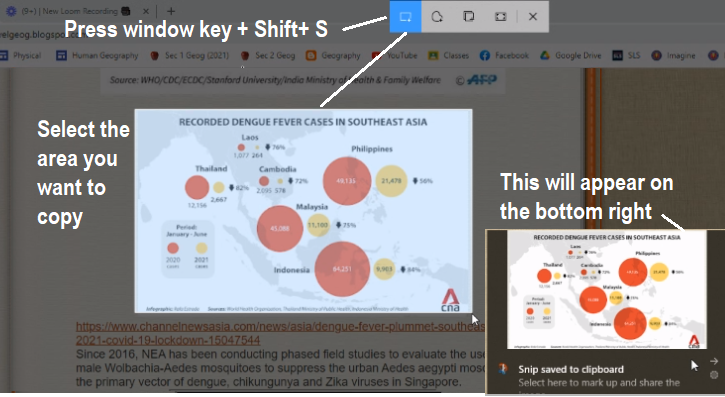
The easiest way to call up Snip & Sketch is with the keyboard shortcut Windows key + Shift + S.
You can also find the Snip & Sketch tool listed in in the alphabetical list of apps accessed from the Start button as well as in the notification panel where it listed as Screen snip.
Once you take your screenshot, it will be saved to your clipboard and show up momentarily as a notification in the lower-right corner of your screen. Click the notification to open the screenshot in the Snip & Sketch app to annotate, save or share it. Or you can paste it onto Paint for editing. I have also been able to paste it in WhatsApp web messages directly.
I like this compared to pressing the printscreen key (PrtScn) as I could choose the part of the screen to copy.
However, you can set the PrtScn button to open the Snip & Sketch tool by going to Settings > Ease of Access > Keyboard and toggling on Use the PrtScn button to open screen snipping under Print Screen Shortcut.
My ICT HOD, Mr Shasi, shared a tool Narakeet which allows the uploading of slides which convert it into a video that is automatically narrated for you. You can choose from about twenty voiceover options, adjust the speed of the voiceover, and choose to have captions automatically added into your video. This was shared to him by Richard which you can see from the videos below.
To use Narakeet you must have your slides in PPTX format. Fortunately, all of the popular slideshow creation tools including Canva, Google Slides, and Keynote let you export your presentations as PPTX files. When you upload your PPTX file to Narakeet your speaker notes are used as the basis for the narration that is created for your video. When your video is completed you can download it as an MP4 file that can be used anywhere that you typically share videos.
From PowerPoint slides:
However, if you just simply want to convert the slides to a video without the auto narration, I have been getting my students to use the screen recording function on PowerPoint Slides which I had shared earlier. My students learned and they were able to create the videos instantly.