As shared by Jinger in SGLDC, a notable blog sharing the use of technology in education. Julie Smith has listed all her blog posts using excel shown below:
Her blog:
https://www.thetechieteacher.net/2019/06/the-techie-teachers-complete-collection.html?m=1
I like the one on factile which is a jeopardy style game
https://www.thetechieteacher.net/2020/02/easily-create-jeopardy-style-games-with.html?m=1

Feb 23, 2020

Feb 21, 2020
Drag and Drop tool in SLS
Using Paint to create or edit Background image and image options
- Create a background image. The recommended image size is 640(W) x 960(H) but you can use any so long as the size is able to be uploaded. You can use Paint (available in all laptop) to size the image - please see below. If the image is too big to be uploaded - you can try to resize it to 80% or less.
 The following is one background image I have used. The horizontal pixel should not exceed 640.
 You can create the image to be used as options


Create drag and drop activity on SLS


Student's view
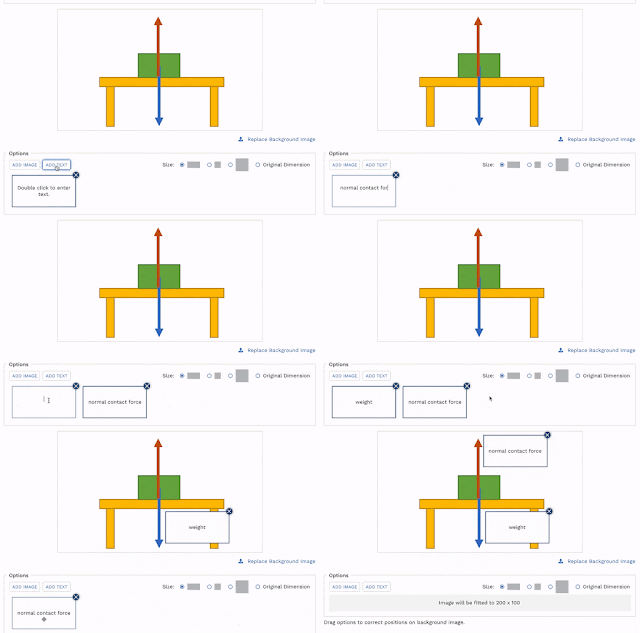
Students will answer a drag-and-drop question by dragging the moveable images or textboxes into the areas marked out as options. This is what the student will see:
Tried out a few more for Geography.
The students have to match the correct explanation for the factor affecting wave energy.
One in which the students have to identify the location of the correct country and then drag and drop it to the image of Africa.
The students have to match the correct explanation for the factor affecting wave energy.
One in which the students have to identify the location of the correct country and then drag and drop it to the image of Africa.

Feb 2, 2020
Interactive compass reading
Shared by 世雄赖 in SGLDC. He had designed it with Lawrence Wee.
https://iwant2study.org/lookangejss/math/ejss_model_Eight_point_compass3/Eight_point_compass3_Simulation.xhtml
Check out the other interactive @
https://iwant2study.org/ospsg/index.php/interactive-resources
https://iwant2study.org/lookangejss/math/ejss_model_Eight_point_compass3/Eight_point_compass3_Simulation.xhtml
Check out the other interactive @
https://iwant2study.org/ospsg/index.php/interactive-resources
Jan 30, 2020
Adding digital locks in SLS
Shared by Zenia Chng in SGLDC
https://www.facebook.com/groups/sglearningdesigners/permalink/781101192377727/
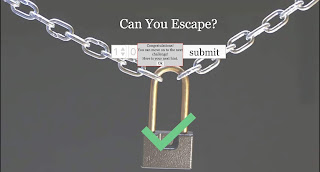
She has created the simulation together with Loo Kang Lawrence Wee. If you're thinking of doing a digital escape room (or activity of similar nature), there is a lock-and-key simulation ready!
To customise your code, follow these 4 simple steps: 1
1) download the ejss.zip file (search in SLS under add media > add from library > location - community gallary > ejss_model_LockAndKey_4digit.zip *to be up soon
2) upload the file into https://ejss-browser-editor.herokuapp.com
3) input your code (0 - 9) and click save. eg. code = 1 2 3 4, enter the following: answer1 = 1 answer2 = 2 answer3 = 3 answer4 = 4
4) download the new ejss.zip file and upload into your SLS lesson as a media.



https://www.facebook.com/groups/sglearningdesigners/permalink/781101192377727/
She has created the simulation together with Loo Kang Lawrence Wee. If you're thinking of doing a digital escape room (or activity of similar nature), there is a lock-and-key simulation ready!
To customise your code, follow these 4 simple steps: 1
1) download the ejss.zip file (search in SLS under add media > add from library > location - community gallary > ejss_model_LockAndKey_4digit.zip *to be up soon
2) upload the file into https://ejss-browser-editor.herokuapp.com
3) input your code (0 - 9) and click save. eg. code = 1 2 3 4, enter the following: answer1 = 1 answer2 = 2 answer3 = 3 answer4 = 4
4) download the new ejss.zip file and upload into your SLS lesson as a media.


Earlier post on Digital escape room by teachers shared in SGLDC
Dec 12, 2019
Talltweets Convert Slides to GIF
I have been using Macromedia Firework to create GIF. Just learned that you can do that using https://talltweets.com/ to convert Google Slides into animated GIF!

Click on the following link for the interactive slide
https://docs.google.com/presentation/d/e/2PACX-1vT7HwBndGTt174FgVYhGyPXJJJL-aynOBnAdASuzmuAdp_tZZz4yYeIFxkX3bLJdlCc-gyIrROyqulU/pub?start=false&loop=false&delayms=60000&slide=id.g6c59ada23f_0_0
created my GIF for my Google classroom and is so easy. Just create the Google slides and then @ talltweets.com choose the google slides and it will convert it to a slides as shown below.

Go to talltweets.com and click on select presentation to browse for your Google slides.

Then just specify the width, e.g. 800 for the header in Google classroom. Then click on create GIF and you download it by clicking save.

Create a custom banner GIF
Watch the video below showing how you can use Google Slides to create a GIF.
https://chrome.google.com/webstore/detail/giphy-for-chrome/jlleokkdhkflpmghiioglgmnminbekdi?hl=en
Dec 10, 2019
New Features on SLS
So grateful for the new features on SLS released in Dec 2019. https://mo.learning.moe.edu.sg/UserGuide/Vle/index.html (SLS login needed to access the user guide)


You can also attempt lessons as student.

You can also make announcements on SLS.

Students will answer a drag-and-drop question by dragging the moveable images or textboxes into the areas marked out as options. This is what the student will see:


Whitelisted websites for embedding into SLS (only via login to SLS)

I have highlighted three features which I really love.
Now you can add teachers as students. Great for PLC as well as collaboration with other teachers. You can also try out the lesson as a student by changing your role in the profile.
Now you can add teachers as students. Great for PLC as well as collaboration with other teachers. You can also try out the lesson as a student by changing your role in the profile.


My favourite feature - Drag and drop question!
- Upload a background image. The image must not exceed recommended dimensions of 640(W) x 960(H). You can use paint to size the image - please see below. Or you can do so by using Powerpoint - resize the slide to custom size and save the slide in image file (jpeg).
- Add Drag and Drop options in the form of images or textboxes.
- These options can be resized to fit the blanks in the background image.
- Drag the options to their correct positions on the background image.


Tried out 2 for Geography. One in which the students have to identify the location of the correct country and then drag and drop it to the image of Africa. The second one is to identify the tectonic features and landforms on a given diagram. It is easier to upload labels created on Paint as the options
for the drag and drop to the image. As for the background image if the size is
too big you can resize it e.g. to 80% of the original and then upload.
Adding Quizzes to your lesson
Since Dec 19, only lessons can be shared. You should be able to insert a quiz into a lesson and share the lesson. The gif below shows how to insert a quiz that was created previously.

Thanks to Send Kwang for sharing in SLS
Nov 14, 2019
Cospaces and blocky in creating VR experiences for students
Applauding the efforts of the team from Hua Yi Sec in using VR in teaching Geography concepts.
You can log into cospaces and look at the 3 experiences which they have created to get the students to explore the unique features of a Place in Geography.
You can search for Clementi, Tiong Bahru and Ang Mo Kio in cospaces.


You can log into cospaces and look at the 3 experiences which they have created to get the students to explore the unique features of a Place in Geography.
You can search for Clementi, Tiong Bahru and Ang Mo Kio in cospaces.


Definitely excited to learn about Cospaces and how you can add the animated characters to theVR experience using Blocky. Will definitely explore!

They have also created the VR experience as a virtual reccee for their Upper Sec fieldwork at Orchard Road.

They have shared other VR resources available online such as the one on Malaria in Tanzania.
and the ST simulation of rising sea level in Singapore.
360 view of an sea arch:
Nov 7, 2019
Screen recording function on Powerpoint
I have always love Powerpoint. Just saw from Byte IT from MOE ITD that you can screen record with screen recording function in Powerpoint and decided to try out.
3.Click on window logo button +shift+Q to stop recording.
Or you can click on the pin icon at the bottom right of the pop up control so that you can just click on the stop button when down. During recording, there is also a pause bottom. This is useful as I gotten my students to take turn to do recordings for a project.

After you have finished recording, it will appear as an inserted media on one of the slides. You can right click on it and save it as a media like the one below.

When I selected the area to record to only the slide area - you can get the students to create a story easily. I did not include audio for this but you can get the students to do so.


Also look at how I made use of Powerpoint to create Quiz and Games:http://ezitnew.blogspot.com/2017/05/use-of-powerpoints-for-quiz-and-games.html
Though much of my use of Powerpoint has been replaced by Google Slides.
Following is the use of Google slides by Amanda:https://docs.google.com/presentation/d/1sxFjWXBWJbC_PPIlNFuG56It0LJOFI7va8I_x_CJM4Q/present?slide=id.p
1.Select Insert from the top menu.
2.Click on the Screen
Recording icon from the top right hand corner.3.Click on window logo button +shift+Q to stop recording.
Or you can click on the pin icon at the bottom right of the pop up control so that you can just click on the stop button when down. During recording, there is also a pause bottom. This is useful as I gotten my students to take turn to do recordings for a project.

You can select the area on the screen for the screen recording (area marked bythe red dotted lines). You can also select whether to include the audio or pointer.
Reminder to click on the pin at the bottom right corner so that the control is available throughout.
After you have finished recording, it will appear as an inserted media on one of the slides. You can right click on it and save it as a media like the one below.

You can see how I made my inserted graphic background transparent.
Shared by Adeline in SGLDC

In powerpoint, there is a record slide show tool that records narration, annotation etc.
You can record your voice over slides, allowing you to 'teach' as you go through the slides.
Once done,
(1) Go to file, export, create a video.
(2) Upload to youtube, private setting
(3) Embed the video into SLS.
Can be use to scaffold learning and going through questions, especially those that needs some annotation / drawings.
Aso shared by Harley.
Directly click on “Export”, select “Create Video” and record narrations also can. Once done, click “Create Video” again and it will be converted into a MP4 video.

Also look at how I made use of Powerpoint to create Quiz and Games:http://ezitnew.blogspot.com/2017/05/use-of-powerpoints-for-quiz-and-games.html
Though much of my use of Powerpoint has been replaced by Google Slides.
Following is the use of Google slides by Amanda:https://docs.google.com/presentation/d/1sxFjWXBWJbC_PPIlNFuG56It0LJOFI7va8I_x_CJM4Q/present?slide=id.p
Nov 1, 2019
Sep 1, 2019
My Notes in SLS
Check out the new My Notes feature in SLS!
Guide by ETD:
https://mo.learning.moe.edu.sg/UserGuide/Vle/student/notes/annotation.html
On the students' device.
The students can highlight on the text using different colours as shown below.

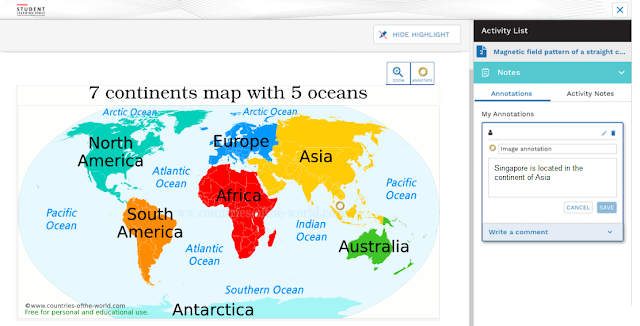
After highlighting the text, the students can add annotations or activity notes and save. The student can also edit or delete the notes as shown below.

Student needs to click on the annotate button on the top right of the image.
Teacher can view the students' notes.
Click on monitor followed by view students' notes.


Cool to be able to view all the notes taken by the students.
Guide by ETD:
https://mo.learning.moe.edu.sg/UserGuide/Vle/student/notes/annotation.html
On the students' device.
The students can highlight on the text using different colours as shown below.

After highlighting the text, the students can add annotations or activity notes and save. The student can also edit or delete the notes as shown below.
 on the top right of the image.
Teacher can view the students' notes.
Click on monitor followed by view students' notes.


Cool to be able to view all the notes taken by the students.
Subscribe to:
Posts (Atom)